


According to Wikipedia:
Focus stacking is a digital image processing technique which combines multiple images taken at different focus distances to give a resulting image with a greater depth of field (DOF) than any of the individual source images (Johnson 2008, 336; Ray 2002, 231–232).
Getting sufficient depth of field can be particularly challenging in macro photography. Depth of field is normally increased by stopping down aperture (using a larger f number), but cannot be stopped down beyond a certain point without suffering from blurring due to diffraction. Focus stacking allows the depth of field of images taken at the sharpest aperture to be effectively increased. The images at right illustrate the increase in DOF that can be achieved by combining multiple exposures.
Focus stacking also offers flexibility, in that images with several different depth of fields can be generated in post processing and compared, and physically unrealizable images with non planar focus regions can be generated.
Other digital imaging techniques used to increase DOF include wavefront coding and plenoptic cameras.
Software's to use (in no particular order):
I haven’t tried Photoshop CS4, Photoacute, Heliconfocus and Zerene Stacker planning on trying it out soon and post some personal review on each softwares. I’ve been using CombineZM on my stacks for quiet some time and very satisfied with the results.
Sample stack image using CombinzeZM software:

22 Focus stacked images.
Focus Stacking Softwares
Full View
Labels:
macro,
photography
According to Wikipedia:
Focus stacking is a digital image processing technique which combines multiple images taken at different focus distances to give a resulting image with a greater depth of field (DOF) than any of the individual source images (Johnson 2008, 336; Ray 2002, 231–232).
Getting sufficient depth of field can be particularly challenging in macro photography. Depth of field is normally increased by stopping down aperture (using a larger f number), but cannot be stopped down beyond a certain point without suffering from blurring due to diffraction. Focus stacking allows the depth of field of images taken at the sharpest aperture to be effectively increased. The images at right illustrate the increase in DOF that can be achieved by combining multiple exposures.
Focus stacking also offers flexibility, in that images with several different depth of fields can be generated in post processing and compared, and physically unrealizable images with non planar focus regions can be generated.
Other digital imaging techniques used to increase DOF include wavefront coding and plenoptic cameras.
Software's to use (in no particular order):
I haven’t tried Photoshop CS4, Photoacute, Heliconfocus and Zerene Stacker planning on trying it out soon and post some personal review on each softwares. I’ve been using CombineZM on my stacks for quiet some time and very satisfied with the results.
Sample stack image using CombinzeZM software:
22 Focus stacked images.
Here is a different way of sharpening your images. It somehow works like High Pass sharpening method but way better and more controllable.
this method I stumbled upon this thread in model mayhem Highpass Sucks (+Solution)
And I quote:
Bottom Line Up Front: High Pass is an inaccurate spatial-frequency based separation technique. The steps below and the actions provided effect a much more accurate result than can be accomplished otherwise.
Background: Ultimately, this is a spinoff of Mr. Connery's thread on deconvolution as an image sharpening technique here, wherein I set forth my method for finer control of such while both remaining within Photoshop and not spending additional $$ on plugins. Key to its success is the separation of high and low spatial frequency image data and the fine-tuning of each.
Separation of spatial frequency data has a number of applications in image editing. Whether for the oft-suggested "High Pass Sharpening", to recover detail lost in an OOF / moving image, or to enhance local contrast throughout the image, the accurate separation of frequency data is relevant for anyone who is a stickler for image quality.
- Start with two copies of the image to be separated.
- Working on the bottom copy, run the gaussian blur filter at the intended pixel frequency (same as you would input into the HP filter).
- Selecting the top copy, choose Apply Image from the Image menu at top (Shift+Ctrl+A on PC; Cmd+Shift+A for Mac).
- In the Layer dialog, select the bottom layer which you blurred in step 2.
- In the Blending dialog, choose Subtract.
- Enter '2' into the Scale box, and '128' for the Offset.
- Preserve Transparency, Mask, and Invert should not be checked.
- Choose OK.
- Your top layer will now look much as a HP result, albeit a bit flatter. Set the Blend Mode to Linear Light. Opacity should remain at 100%.
Sounds too alien, right? So here's the step by step with illustration for you to easily understand how to do this
1. Start with two copies of the image to be separated.
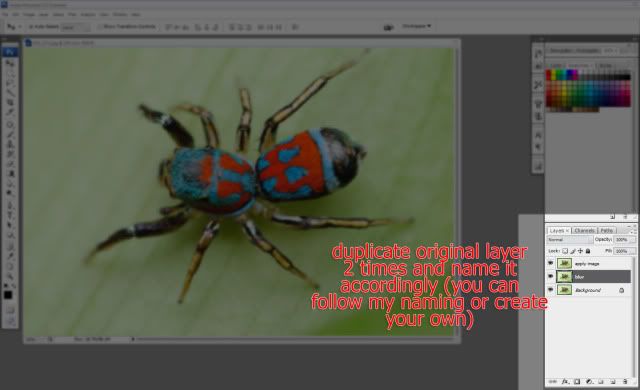
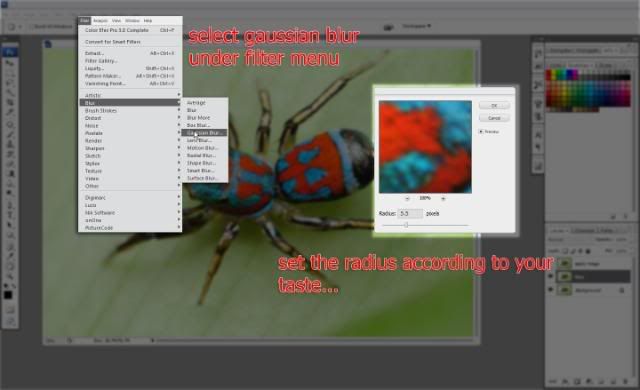
2. Working on the bottom copy("Blur" named layer), run the gaussian blur filter at the intended pixel frequency (same as you would input into the HP filter).
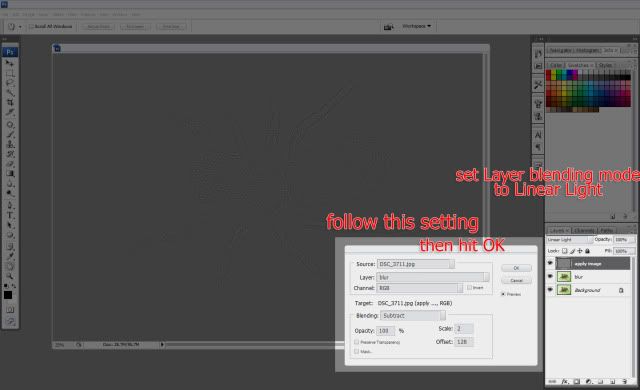
3. Selecting the top copy, Set it's blending mode to Linear Light (or you choose to do this last) choose Apply Image from the Image menu at top (Shift+Ctrl+A on PC; Cmd+Shift+A for Mac).

4. In the Layer dialog, select the bottom layer which you blurred in step 2., In the Blending dialog, choose Subtract. Enter '2' into the Scale box, and '128' for the Offset. Preserve Transparency, Mask, and Invert should not be checked. Note: I already set the Blending mode to Linear light.
5.Your top layer will now look much as a HP result. Set the Blend Mode to Linear Light(In this case I already set the blending mode to Linear Light before apply image. Opacity should remain at 100%.
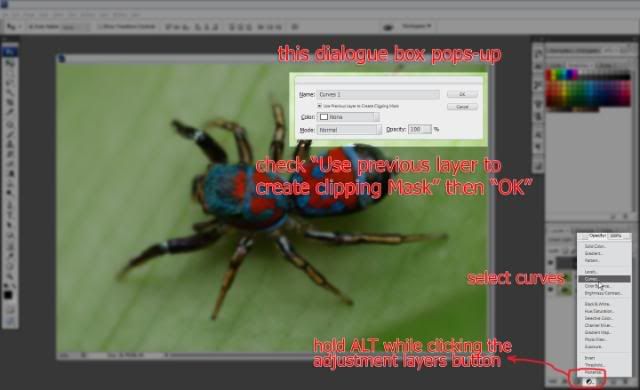
6. To further enhanced the sharpness and overall look of the image. Apply Curve Adjustment Layer clip on the layer where you did the Apply Image command.
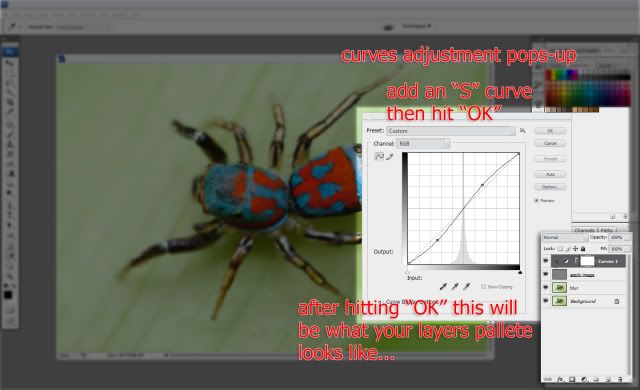
Viola!!! that's it.
Here is my final image in 100%.

Actually there is a lot you could do with this technique and not just sharpening. Kudos to those people who discovered this technique.
Read more about it here: Highpass Sucks (+Solution)
High Pass like Sharpening
Full View
Labels:
photoshop,
tutorial
this method I stumbled upon this thread in model mayhem Highpass Sucks (+Solution)
And I quote:
Bottom Line Up Front: High Pass is an inaccurate spatial-frequency based separation technique. The steps below and the actions provided effect a much more accurate result than can be accomplished otherwise.
Background: Ultimately, this is a spinoff of Mr. Connery's thread on deconvolution as an image sharpening technique here, wherein I set forth my method for finer control of such while both remaining within Photoshop and not spending additional $$ on plugins. Key to its success is the separation of high and low spatial frequency image data and the fine-tuning of each.
Separation of spatial frequency data has a number of applications in image editing. Whether for the oft-suggested "High Pass Sharpening", to recover detail lost in an OOF / moving image, or to enhance local contrast throughout the image, the accurate separation of frequency data is relevant for anyone who is a stickler for image quality.
- Start with two copies of the image to be separated.
- Working on the bottom copy, run the gaussian blur filter at the intended pixel frequency (same as you would input into the HP filter).
- Selecting the top copy, choose Apply Image from the Image menu at top (Shift+Ctrl+A on PC; Cmd+Shift+A for Mac).
- In the Layer dialog, select the bottom layer which you blurred in step 2.
- In the Blending dialog, choose Subtract.
- Enter '2' into the Scale box, and '128' for the Offset.
- Preserve Transparency, Mask, and Invert should not be checked.
- Choose OK.
- Your top layer will now look much as a HP result, albeit a bit flatter. Set the Blend Mode to Linear Light. Opacity should remain at 100%.
Sounds too alien, right? So here's the step by step with illustration for you to easily understand how to do this
1. Start with two copies of the image to be separated.
2. Working on the bottom copy("Blur" named layer), run the gaussian blur filter at the intended pixel frequency (same as you would input into the HP filter).
3. Selecting the top copy, Set it's blending mode to Linear Light (or you choose to do this last) choose Apply Image from the Image menu at top (Shift+Ctrl+A on PC; Cmd+Shift+A for Mac).
4. In the Layer dialog, select the bottom layer which you blurred in step 2., In the Blending dialog, choose Subtract. Enter '2' into the Scale box, and '128' for the Offset. Preserve Transparency, Mask, and Invert should not be checked. Note: I already set the Blending mode to Linear light.
5.Your top layer will now look much as a HP result. Set the Blend Mode to Linear Light(In this case I already set the blending mode to Linear Light before apply image. Opacity should remain at 100%.
6. To further enhanced the sharpness and overall look of the image. Apply Curve Adjustment Layer clip on the layer where you did the Apply Image command.
Viola!!! that's it.
Here is my final image in 100%.
Actually there is a lot you could do with this technique and not just sharpening. Kudos to those people who discovered this technique.
Read more about it here: Highpass Sucks (+Solution)


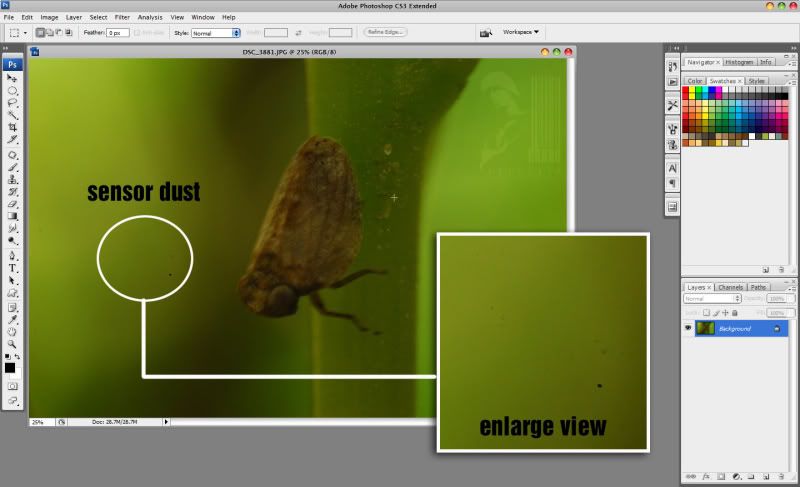
If you haven't cleaned your camera sensor lately or haven't cleaned it at all and sensor dust spots are evident in your photos, then these tutorial is for you... cleaning dust spots the quick and easy way digitally in photoshop... so fire up your photoshop and follow along this simple steps...
1. Open up your file...
2. Create a snapshot of your image... go to history panel and click on the camera icon...

3. Go to filter ---> noise ----> dust and scratches

4. point and click your mouse on the darkest spot...
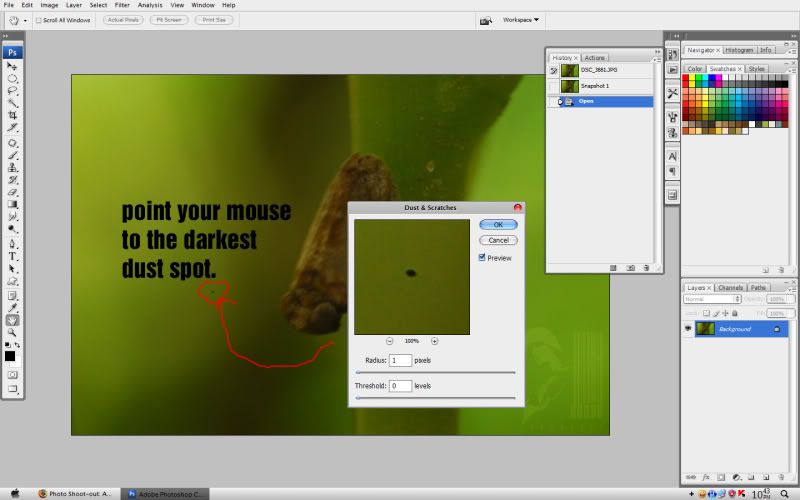
5. adjust the radius till the dust spot is lost and adjust the threshold to bring back some noise on the photo. Click Ok if your done with your adjustments...

6. Create another snapshot of the photo. Click snapshot 1 to go back to the previous state of your photo, click on the square beside snapshot 2 so that when you brush using history brush it apply whatever there is in that snapshot (in this case the previously applied dust and scratches filter), select history brush and change its mode to lighten.
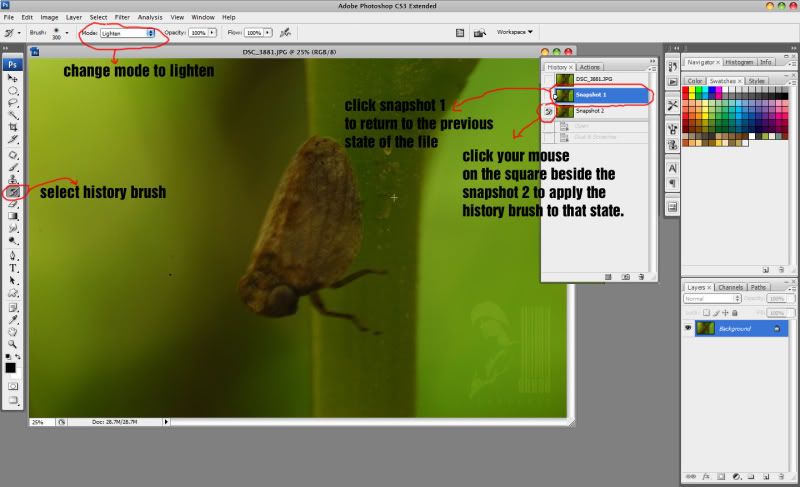
7. Brush the dark spots away....
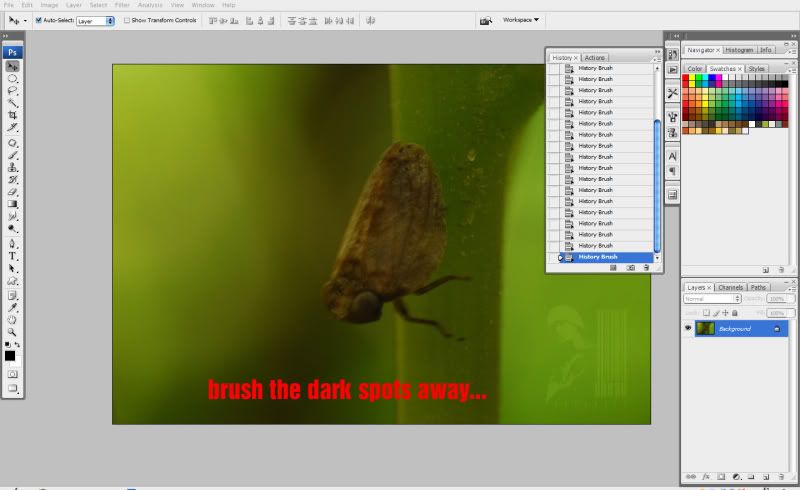
This method is wayyyy faster than using clone stamp tool and patch tool/healing brush tool...
hope you learn something from this post...
Cleaning sensor dust spots on your Images
Full View
Labels:
photoshop,
tutorial
1. Open up your file...
2. Create a snapshot of your image... go to history panel and click on the camera icon...
3. Go to filter ---> noise ----> dust and scratches
4. point and click your mouse on the darkest spot...
5. adjust the radius till the dust spot is lost and adjust the threshold to bring back some noise on the photo. Click Ok if your done with your adjustments...
6. Create another snapshot of the photo. Click snapshot 1 to go back to the previous state of your photo, click on the square beside snapshot 2 so that when you brush using history brush it apply whatever there is in that snapshot (in this case the previously applied dust and scratches filter), select history brush and change its mode to lighten.
7. Brush the dark spots away....
This method is wayyyy faster than using clone stamp tool and patch tool/healing brush tool...
hope you learn something from this post...
Welcome to my blog, before anything else let me introduce myself, Just call me dhead a freelance graphic artist and digital photographer. this will be the place to place my thoughts on anything that is related to photography, photoshop, image editing, design, layout and everything or anything under the sun. This will also be the place where I will be posting some links to the site that I find interesting or that interest me and that I find useful and learned something from not just for me but for everyone that share the same interests like me. I will try to update this as much as I could once a week. So everyone welcome me to the world of blogging..... weeeeeeeeeeeeeeee...
----------------------------------------------------------------------------------------
in the the meantime take time to visit my deviantart account.
dhead.deviantart.com
An introduction
Full View
Labels:
design,
layout,
photography,
photoshop
Welcome to my blog, before anything else let me introduce myself, Just call me dhead a freelance graphic artist and digital photographer. this will be the place to place my thoughts on anything that is related to photography, photoshop, image editing, design, layout and everything or anything under the sun. This will also be the place where I will be posting some links to the site that I find interesting or that interest me and that I find useful and learned something from not just for me but for everyone that share the same interests like me. I will try to update this as much as I could once a week. So everyone welcome me to the world of blogging..... weeeeeeeeeeeeeeee...
----------------------------------------------------------------------------------------
in the the meantime take time to visit my deviantart account.
dhead.deviantart.com


