


Archive for September 2009
Here is a different way of sharpening your images. It somehow works like High Pass sharpening method but way better and more controllable.
this method I stumbled upon this thread in model mayhem Highpass Sucks (+Solution)
And I quote:
Bottom Line Up Front: High Pass is an inaccurate spatial-frequency based separation technique. The steps below and the actions provided effect a much more accurate result than can be accomplished otherwise.
Background: Ultimately, this is a spinoff of Mr. Connery's thread on deconvolution as an image sharpening technique here, wherein I set forth my method for finer control of such while both remaining within Photoshop and not spending additional $$ on plugins. Key to its success is the separation of high and low spatial frequency image data and the fine-tuning of each.
Separation of spatial frequency data has a number of applications in image editing. Whether for the oft-suggested "High Pass Sharpening", to recover detail lost in an OOF / moving image, or to enhance local contrast throughout the image, the accurate separation of frequency data is relevant for anyone who is a stickler for image quality.
- Start with two copies of the image to be separated.
- Working on the bottom copy, run the gaussian blur filter at the intended pixel frequency (same as you would input into the HP filter).
- Selecting the top copy, choose Apply Image from the Image menu at top (Shift+Ctrl+A on PC; Cmd+Shift+A for Mac).
- In the Layer dialog, select the bottom layer which you blurred in step 2.
- In the Blending dialog, choose Subtract.
- Enter '2' into the Scale box, and '128' for the Offset.
- Preserve Transparency, Mask, and Invert should not be checked.
- Choose OK.
- Your top layer will now look much as a HP result, albeit a bit flatter. Set the Blend Mode to Linear Light. Opacity should remain at 100%.
Sounds too alien, right? So here's the step by step with illustration for you to easily understand how to do this
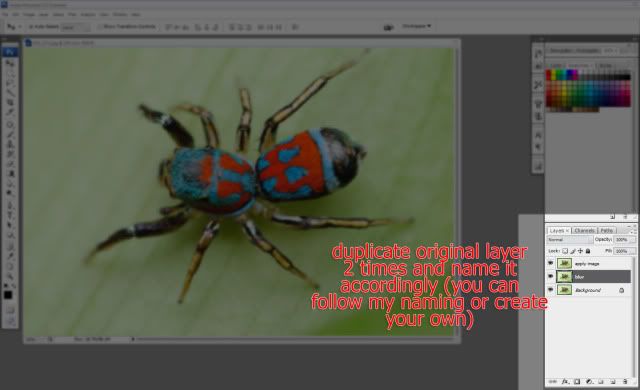
1. Start with two copies of the image to be separated.
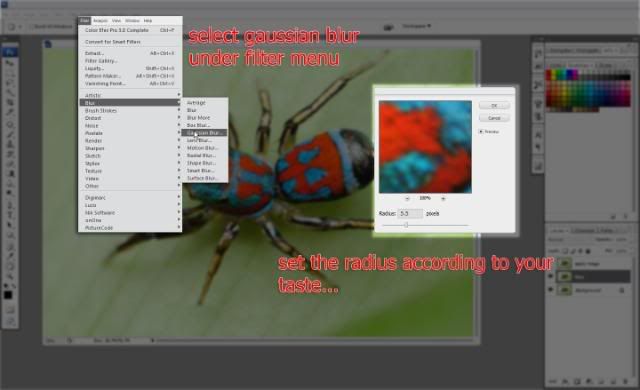
2. Working on the bottom copy("Blur" named layer), run the gaussian blur filter at the intended pixel frequency (same as you would input into the HP filter).
3. Selecting the top copy, Set it's blending mode to Linear Light (or you choose to do this last) choose Apply Image from the Image menu at top (Shift+Ctrl+A on PC; Cmd+Shift+A for Mac).

4. In the Layer dialog, select the bottom layer which you blurred in step 2., In the Blending dialog, choose Subtract. Enter '2' into the Scale box, and '128' for the Offset. Preserve Transparency, Mask, and Invert should not be checked. Note: I already set the Blending mode to Linear light.
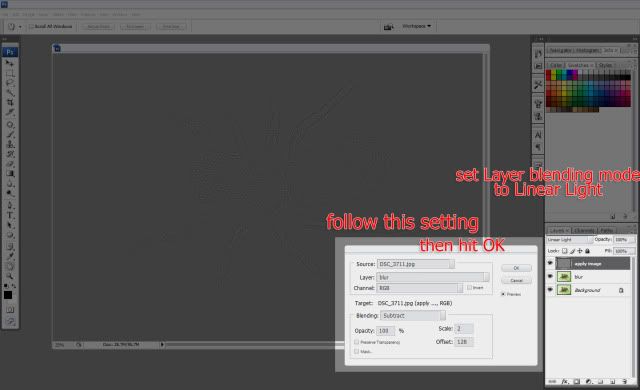
5.Your top layer will now look much as a HP result. Set the Blend Mode to Linear Light(In this case I already set the blending mode to Linear Light before apply image. Opacity should remain at 100%.
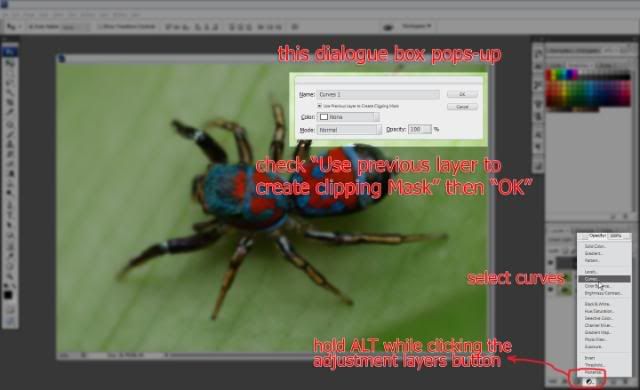
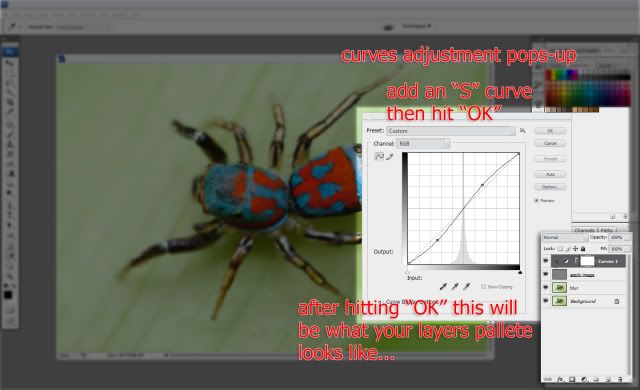
6. To further enhanced the sharpness and overall look of the image. Apply Curve Adjustment Layer clip on the layer where you did the Apply Image command.
Viola!!! that's it.
Here is my final image in 100%.

Actually there is a lot you could do with this technique and not just sharpening. Kudos to those people who discovered this technique.
Read more about it here: Highpass Sucks (+Solution)
High Pass like Sharpening
Full View
Labels:
photoshop,
tutorial
this method I stumbled upon this thread in model mayhem Highpass Sucks (+Solution)
And I quote:
Bottom Line Up Front: High Pass is an inaccurate spatial-frequency based separation technique. The steps below and the actions provided effect a much more accurate result than can be accomplished otherwise.
Background: Ultimately, this is a spinoff of Mr. Connery's thread on deconvolution as an image sharpening technique here, wherein I set forth my method for finer control of such while both remaining within Photoshop and not spending additional $$ on plugins. Key to its success is the separation of high and low spatial frequency image data and the fine-tuning of each.
Separation of spatial frequency data has a number of applications in image editing. Whether for the oft-suggested "High Pass Sharpening", to recover detail lost in an OOF / moving image, or to enhance local contrast throughout the image, the accurate separation of frequency data is relevant for anyone who is a stickler for image quality.
- Start with two copies of the image to be separated.
- Working on the bottom copy, run the gaussian blur filter at the intended pixel frequency (same as you would input into the HP filter).
- Selecting the top copy, choose Apply Image from the Image menu at top (Shift+Ctrl+A on PC; Cmd+Shift+A for Mac).
- In the Layer dialog, select the bottom layer which you blurred in step 2.
- In the Blending dialog, choose Subtract.
- Enter '2' into the Scale box, and '128' for the Offset.
- Preserve Transparency, Mask, and Invert should not be checked.
- Choose OK.
- Your top layer will now look much as a HP result, albeit a bit flatter. Set the Blend Mode to Linear Light. Opacity should remain at 100%.
Sounds too alien, right? So here's the step by step with illustration for you to easily understand how to do this
1. Start with two copies of the image to be separated.
2. Working on the bottom copy("Blur" named layer), run the gaussian blur filter at the intended pixel frequency (same as you would input into the HP filter).
3. Selecting the top copy, Set it's blending mode to Linear Light (or you choose to do this last) choose Apply Image from the Image menu at top (Shift+Ctrl+A on PC; Cmd+Shift+A for Mac).
4. In the Layer dialog, select the bottom layer which you blurred in step 2., In the Blending dialog, choose Subtract. Enter '2' into the Scale box, and '128' for the Offset. Preserve Transparency, Mask, and Invert should not be checked. Note: I already set the Blending mode to Linear light.
5.Your top layer will now look much as a HP result. Set the Blend Mode to Linear Light(In this case I already set the blending mode to Linear Light before apply image. Opacity should remain at 100%.
6. To further enhanced the sharpness and overall look of the image. Apply Curve Adjustment Layer clip on the layer where you did the Apply Image command.
Viola!!! that's it.
Here is my final image in 100%.
Actually there is a lot you could do with this technique and not just sharpening. Kudos to those people who discovered this technique.
Read more about it here: Highpass Sucks (+Solution)


